


Composting
Knowing that the better the life in your soil, the better the functionality of providing everything your crop requires has lead somewhat to a whole industry that sells ‘bugs in jugs’ on the principle that they improve the biology in your soil. There are however some serious issues that need understanding before using any of them.
There are many more unanswered questions, but essentially there are also alternatives that you can control and produce yourself in the knowledge that you are creating a much more rich diverse soil amendment.
Compost… There is Compost ‘an organic amendment’ and then, Compost ‘as a biological inoculum’! Both start out the same, but their finished results couldn’t be any more different.
Most compost is made by piling large amounts of organic material in a heap and letting it rot down over time. There might be occasional turning but essentially the compost produced is mostly devoid of oxygen as air can only penetrate about 30cm into a compost heap and therefore the majority of the compost is made under anaerobic conditions. Excessive heat is produced (and lost as energy) and the heap shrinks releasing the carbon from the compost pile as carbon dioxide, as well as hydrogen sulphide, that generally gives the compost heap the smell of rotting eggs.
This compost is generally therefore described as the organic amendment, it can be used to help build organic matter in soils and will have levels of macro and micro nutrients that can be released over time to the soil and in turn feed the plants.
Bokashi Bin
One way of improving this scenario is to use the ingredients in a Bokashi (Japanese that translates as ‘fermented organic matter’, this uses the principle of anaerobic conditions but at a lower temperature and without the release of CO2. Material is added to the compost bin/bag, air compressed out as much as possible and inoculated with Bokashi ‘bran’ this medium is inoculated with beneficial microbes that flourish in anaerobic, acidic environments but smell less foul than do those in unfettered, natural anaerobic conditions. To prepare the inoculant, a brew that will attract the appropriate bacterial strains is prepared, the host material is immersed in it, and the microbes are allowed to ferment. Molasses provides an energy source for the microbes which reproduce wildly for several days. Once the fermentation stage is over, the inoculated host can be dried, packaged, and stored for long periods.
We have a Bokashi bin in the kitchen, there is somewhat a fight between bokashi and the wormery! The first batches made on the small scale have produced some very good useable compost. The next stage will be to scale it up to see if it can produce good stable compost on an industrial scale.
More information can be found about Bokashi on the links below:
Planet Natural Research Centre
Agriton
Alternatively the compost can be ‘managed’ in such a way that beneficial aerobic microbes can thrive and when applied to the soil the microbes ‘inoculate’ the soil and help the process of increasing soil diversity and then multiply improving the soils ‘health’.
This management is however not that straight forward and Dr Elaine Ingham has made a whole career and successful business travelling the world explaining how to do it properly. Her courses are essential when looking at taking the next step to understanding soil functionality.

Dr Elaine Ingham’s Way of Making Compost


Essentially there are rules that need to be adhered to in order to make successful compost this way.
Diversity of mix.
Ratio browns:greens:high N.
Small quantity first.
Require high N for heat, not necessary on big heaps.
Important to measure depending on what you want.
Ideally with weight, can be volume.
High N, could be legumes, manure 10-11% of mix, any more gets too hot!
More fungi, more woody.
Balanced, half and half woody and green.
Green – important for 2 reasons.
Bacterial food.
Holds temperature between turns.
Shredding is very good, increase surface area and easier to mix and handle.
Grass silage can be used as green.
Brown, wood chip, leaves, straw, plants gone to seed.
Bacteria break down short chains (green material).
Fungi break down long chains (brown material).
Nitrogen materials feed heat producing bacteria.
Make sure it’s wet, then draining it before mixing.
Ash inside compost heaps are actinobacteria that have run out of oxygen and water. (white ring about 30cm in a compost heap)
Heat comes from actinobacteria eating and breeding.
Making the compost
Shred the material.
Wet but not sloppy.
Mix it well!
Fungi need nitrogen too, not a lot but at the growing tip. (Acid tips able to drill through rocks 5mm a week!)
Windrow 1m high 1.5m wide (standard compost pile by tractor turners).
Pile up.
Temperature important – measure 3 times and take an average.
Beneficial microbes can survive higher temperatures. Weed seeds and pathogens are killed at these temperatures.
55 degrees – Keep at this temp for 3 days
65 degrees – Keep at this temp for 2 days
74 degrees – Keep at this for 1 day
Don’t go above 75 degrees
You are not composting below 55 degrees!
Moisture is Important
Grab a sample at surface and below surface
Looking for 50% water, when squeezed a drop forms
60% many drops
70% pouring out
When squeezed but no moisture comes out, if holds together 40% if it falls apart 30%.
Looking for 50%.
Useful to have it undercover to control water either going in or evaporating out.
You want to see actinobacteria and it tells you that you are about to run out of oxygen, they occupy the space between oxygen and hypoxic conditions. If you have a ring of actinobacteria in the pile, everything inside is anaerobic. Wet throughout the heap, not patches of dry.
Turning – the whole volume of the material has to go through the hot centre. It is essential to turn the heap inside out, turners lift the middle and pull the sides in to the middle.
3 turns is the minimum. PAS 100 in the U.K. don’t give guidelines for how many turns you need to do.
Takes 6 months minimum to make the compost (usually 12 months).
Heat method 21 years (Elaine Ingram) minimum although fungi takes 30 days.
4 groups of microbes.
Bacteria, fungi, (1st trophic level).
Protozoa, Nematodes Feed on above.
Johnson-Su Bioreactor
An Alternative to Elaine Ingham’s compost is the Johnson-Su bioreactor. It works on exactly the same principle as Dr Ingham’s however with the benefit that it is a static method, meaning it doesn’t require frequent turning.
The Johnson-Su Bioreactor method of creating compost is quite different from other composting methods in several respects. The most common commercial windrow composting processes are usually designed and operated for speed and maximum product flow. Unfortunately, this focus does not allow the compost to degrade sufficiently. It can even produce an immature compost that in some cases is detrimental to plant growth. Most home composting methods require building a pile and turning it at regular intervals. Both windrow and static pile approaches can produce undesirable smells, attract flies, and be problematic with neighbors. However—when built and maintained correctly—the Johnson-Su bioreactor never needs turning, never has smells, and does not attract flies. The material is composted aerobically which encourages a complete biological breakdown of compost materials that results in a microbially diverse, fungal-dominant product.
Normal compost is similar to mulch in consistency. The compost from Johnson-Su composting bioreactors has the consistency of clay when mature. You can actually squeeze it like clay through your fingers. When mature this compost can be applied as an extract, used to coat seeds for planting in large farming operations, or be applied directly as a soil amendment. It improves seed germination rates when used to coat seeds, improves soil water infiltration and water retention by helping to increase soil carbon content, and increases plant health, plant growth rates, and crop production.
Dr Johnson has produced both a leaflet and youtube video (links below) which explains everything required to build a bioreactor and why they are successful.
Although only relatively small amounts of product from the Johnson-Su are required per Ha, it would be expected that a single reactor would produce enough material to treat approximately 5-10 Ha direct to the soil.
How I built a scaled-up Johnson-Su
I therefore embarked on scaling up the Johnson-Su, the series of photographs demonstrate more clearly what I did.
- An old tipping trailer with a rotten bed was stripped down to the chassis and a reinforcement reed bar mesh welded on to create a 1 meter high, 2 meter wide, 4 meter long open top box.
- The reed bar mesh was then lined with strong gale breaker offcuts (supplied by Jeremey Scudamore)
- 4” drain pipes (without holes as these are totally unnecessary) cut to 1.2 meters requirement 32 pipes (to be arranged so no part of the compost will be more than 30cm from an air source.
- Pipes are screwed to 90mm round fence post wedges that are connected to a 50mm square wooden beam, this prevents compost from falling into the tubes.
- Pipes are lifted into the trailer and screwed to pre erected wooden beam holders
- Pipes arranged throughout the whole trailer, there is no point on the trailer which is more than 30cm from access to air.
- Materials ready for the shredder, bale of wheat straw, bean haulm, linseed bale, clover, bag of freshly foraged maize, pig muck, horse muck and fresh wood chip.
- Hired shredder to increase the surface area of the material, clover and linseed caused the shredder some difficulty!
- Telehandler was used to keep mixing the material
- Sprinkler was left running the whole time the material was being shredded to make sure everything was thoroughly ‘wetted’
- Telehandler used to load the material into the reactor
- Trailer parked up for 36 hours as early thermal phase heats material and ‘sets’ the compost.
- Pipe removal using tele handler was extremely simple.
- Holes from surface to base formed extremely well.
- Plenty of heat generated for the first 7 days and reversed into a barn that is relatively unused.
- Automatic garden irrigation system installed to keep the compost damp.
- 4 weeks after, already can be seen the compost volume is starting to reduce, the thermal phase is complete and therefore the introduction of worms collected from the farm begins (worms introduced every 3 weeks for 12 weeks).
The compost will be left for 400 days (research has suggested this is the optimum time for the most consistent results)
After this period the resultant material will be first inspected using a microscope, I use a Omax 40x-2000x Binocular microscope and need to make sure the sample contains the beneficial microbes I require.
Daniel Tyrkiel’s is my compost/microscope guru who is the owner of T.I. Soil Ecology Laboratory Ltd of which I am part of his advisory board.
I will use the resultant material (assuming passing the microscope test) in a number of ways.
- Solid application, material will be applied at 40 kg per Ha as a soil inoculant (this will be mainly used in the vineyard, chaos garden and forest garden.
- Slurry application to add and mix with seed pre planting.
- Extraction for application to the seed at the point of planting.


Vermiculture – The Keeping of Worms
If you read the historical information below it will come as no surprise that the earthworm is held in such high regard and is critical to healthy soil and providing natural nutrition as part of the soil food web. It is also no surprise that the farming of wood for their by-product has become a part of regenerative agriculture. Of course the easiest thing to do is provide the best environment in your soil that worms cans thrive, that is a continuous living root and plenty of returned organic material to the soil. However, this is not always possible and the want for ‘more’ is never far away, therefore the process of worm farming has also become a very real thing.
Worm farming, otherwise known as vermiculture (vermis from the Latin for worm) is the process of harnessing earthworms to convert organic waste into the world’s most nutrient-rich fertiliser; worm manure. Worm manure – also worm castings or vermicompost – is teeming with minerals, nutrients and beneficial micro-organisms essential for healthy plant growth, root development and disease suppression. Due to the nutritional superiority of worm manure, farmers and gardeners often refer to it as ‘Black Gold’, with one tablespoon enough to feed a small plant for three months.
There are quite literally thousands of websites and youtube videos explaining how to set one up, feed it and use it, on both a household scale and commercial scale.
We purchased our worm farm a few years ago and have been using the resultant vermicompost on our Chaos Garden both as vermicompost applications and vermitea for foliar applications.


Vermiculture History
Charles Darwin (12 February 1809 – 19 April 1882)
Is best known for his contribution to the theory of evolution and his book On the Origin of Species but he was also fascinated by earthworms whose behaviour he observed and experimented on in his garden at Down House, Downe, Kent. Darwin’s book The Formation of Vegetable Mould through the Action of Worms, with Observations on their Habits, is the result of his 40-year study on earthworms, including a 29-year experiment measuring the rate that a stone is buried by the burrowing activities of earthworms. ‘Worms’ as it is affectionately known was very popular, initially outselling On the Origin of Species with 6,000 copies in the first year, and was to be Darwin’s last scientific book, published in October 1881 just six months before he died.
Darwin found that earthworms have no sense of hearing – being indifferent to being shouted at and various musical instruments including a piano, a bassoon and a tin whistle. However, earthworms in pots placed upon a piano retreated into their burrows when notes were played indicating they are sensitive to vibrations transmitted through the soil. Darwin also investigated earthworm’s sense of smell by blowing tobacco smoke and perfume to which they did not react. They did however respond to the smell of their favourite foods. Darwin experimented with giving captive earthworms many different foods and noted which they preferred. He found wild cherry leaves were preferred over lime and hazel leaves. Cabbages, horseradish, carrot and celery were also liked but herbs such as sage, thyme and mint were barely touched.
Much of Darwin’s book covers his work measuring the amount of earth brought to the surface by earthworms, both by measuring the number of casts (soil passed out of earthworms) produced and the rate that objects sink into the ground.
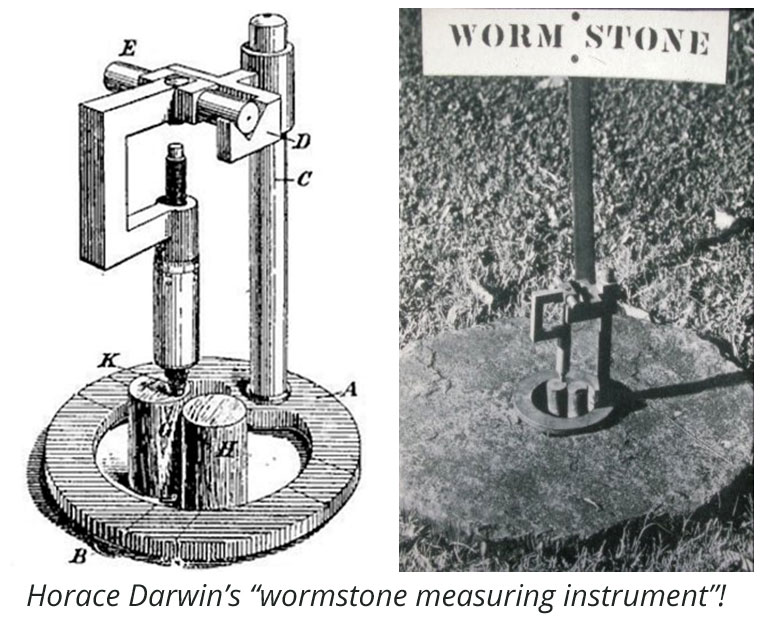
The ‘worm stone’ experiment was elegantly simple. Using a device invented by Horace (His son) in 1870 the surface of the worm stone was measured relative to the height of the surrounding soil surface. This change in the relative horizon was discerned by fitting the device on three metal slots that had been added to the edge of a central hole in the worm stone. Metal rods inserted through this same hole were connected to underlying bedrock, ensuring that these would stay stationary as worms churned the surrounding soil. Thus these rods acted as a horizontal datum through which any changes in the ground surface could be compared.
The illustration of Horace Darwin’s “wormstone measuring instrument,” with “K” pointing to where the instrument was placed to contact with the metal rods; the change with each measurement over time between this and “A” (a metal ring) would then show how much the stone had sunk downward.
Darwin figured that the burrowing activity of earthworms underneath the stone, as well as sediment deposition at the surface as fecal castings, would result in the stone “sinking” over time, becoming buried from below. He was right. Using the wormstone and Horace’s measuring device, he calculated the approximate rate of sinking (2.2 mm/year). This was also a measure of soil deposition, which he attributed to earthworms depositing the sediment through fecal castings. Extrapolating these results further, he estimated that 7.5 to 18 tons (6.8-16.4 tonnes) of soil were moved by worms in a typical acre (0.4 hectares) of land.
Deep-living (or anecic) earthworms create a deep vertical burrow which often has a midden consisting of stones, leaves, twigs and other items pulled into the entrance – perhaps as protection against predators, rain, cold or drought. Darwin found that earthworms do not select items randomly – he provided them with different types of leaves and observed how they were pulled down, finding that 80% of the leaves had been drawn in by the tip. Darwin then experimented further by providing the earthworms with triangles of paper – some broad and others narrow – and as with leaves the narrower end was dragged down first.
Darwin concludes that “there are few animals which have played so important a part in the history of the world than the earthworm”.
Sir Albert Howard (8 December 1873 – 20 October 1947)
Was the founder of the organic farming movement. He worked for 25 years as an agricultural investigator in India, first as Agricultural Adviser to States in Central India and Rajputana, then as Director of the Institute of Plant Industry at Indore, where he developed the famed Indore composting process, which put the ancient art of composting on a firm scientific basis.Howard was a brilliant development worker. Early in his career he abandoned the restrictions of conventional agricultural science with its increasing overspecialisation — “learning more and more about less and less” — and set out to learn how to grow a healthy crop in typical conditions in the field, rather than the usual untypical conditions in laboratories and test-plots that represented nothing other than themselves.
He adopted the best teachers: Nature — “the supreme farmer”, India’s peasants (whom he regarded as his prime “customers”), and the pests and weeds the scientists were committed to fighting with an ever-widening array of poisons, but which Howard called his “Professors of Agriculture”. He saw pests in the context of Nature’s use for them as censors of soil fertility levels and unsuitable crops growing in unsuitable conditions. He found that when the unsuitable conditions were corrected the pests departed. His crops were virtually immune to pest attack, and so was his livestock.
Albert Howard “worm cast humus content was 50% greater than the average topsoil and contains 5 times the nitrogen 7 times soluble phosphate and 11 times the potassium”
Albert Howard “good soils with healthy worm population would produce in a year 25 tonnes of worm casts per acre”.
How to make and use Worm Tea
Brewing a high-quality batch of worm tea is an easy, straightforward process.
Gather your materials. To make worm tea, you’ll need a compost tea bag (this can be any porous, natural fibre bag), a 25 litre bucket of rainwater, and worm castings (should fill about a tenth of the bucket).
Fill the bag with worm castings. Fill your porous worm tea bag with your vermicompost (the worm castings), and tie the open end of the bag shut.
Steep the bag in a bucket of water. Begin the steeping process by submerging the teabag in the bucket of water. Aeration boosts microbial activity, Use a fish tank bubbler to add extra oxygen to your worm tea (more air the better).
Keep the bag submerged overnight. You’ll know your worm tea is ready to use when the water is light brown.
Dilute the tea with water. Remove both the fish tank bubbler and the teabag from the bucket. Dilute the tea with an additional 25 litres of water; the tea won’t lose its potency and will last longer.
Once you’ve brewed worm tea, use it as soon as possible. Water your plants with worm tea every two weeks, or once a week for fruits and vegetables.
Choose your delivery method. A watering can or spray bottle are acceptable options. If using a sprayer, strain the worm tea to avoid clogging the spraying mechanism.
Water your plants with worm tea. You can water your both your outdoor garden plants and your houseplants with worm tea. Make sure to cover both the soil and the plants’ leaves. In addition to fertilising the soil, the microbes in the tea help stave off plant disease.
Do not store any leftover tea! the water environment is not conducive for the aerobic microbes to survive, so only mix in batches that you can use immediately.
Biochar and Terra Preta
I was first introduced to the term Terra Preta during my visit to the Amazon in Brazil for my Nuffield in 2016.
The following article sums up biochar as well as anything else I’ve found (https://www.allotment-garden.org/composts-fertilisers/biochar-terra-preta/)
Terra Preta is Portuguese for ‘black earth‘ and refers to areas of dark, fertile soil discovered in the Amazon basin. The reason for the soil fertility, in an area where the soils are noted for their lack of fertility, is attributed to the use of biochar by the civilisation that thrived there some 2,500 years ago.
Biochar is the name given to charcoal made from plant materials and wood in the same way as ordinary charcoal is made with controlled burning or roasting in the absence of oxygen, known as pyrolysis. This is usually ground into small particles.
The charcoal is then inoculated with microbial mixtures and nutrients. This is known as activating or charging the biochar.
Benefits of Biochar
The enthusiastic advocates claim that adding biochar to soil will:
- Increase soil fertility and nutrient availability producing better crops
- Increase the microbial flora and fauna of the soil
- Stabilise soils and after using for a number of years or adding a sufficient amount, produce a permanent change in the soil as with the fertile Amazonian Terra Preta black earth.
- Lock up carbon in the soil, reducing CO2 in the atmosphere and mitigating the climate change problem
There is no doubt that the Terra Preta of the Amazon exists and is very fertile but exactly how the pre-historic inhabitants achieved this is not known. It’s possible that natural, local processes took part. Terra Preta is associated with shards of pottery and other remains that that imply the charcoal was thrown into a midden. That certainly would have been rich in microbes. Some of the most enthusiastic advocates and studies showing very good results seem to be in tropical or semi-tropical climates which would suggest climate may be a factor.
Biochar in temperate climates such as Europe and the UK may well react differently to the tropics and a few studies have indicated that biochar, far from being beneficial may actually be harmful in the short term. This is most likely due to using uncharged biochar. That is ‘raw’ biochar / crushed charcoal. We now know that biochar needs to be inoculated with nutrients and microbes to work as advertised, that is activated or charged.
Having said that, the bulk of studies are promising and showing very positive results. We’re still researching biochar and seeking to understand the factors that influence it.
The pH of charcoal is generally very high, 8.4 having been measured. This is an extremely alkaline product and whilst useful to sweeten acid soils would make naturally alkaline soils too alkaline for many plants. Generally vegetable crops like a pH of around 6.5 to 7.2 at most. Adding large quantities of biochar could even make acid soils too alkali to support crops in theory.
Using smaller quantities of biochar on an acid soil would certainly be beneficial in that it would increase the pH in a similar way to adding lime to soil.
It seems the micro-pores in biochar provide a home for a starting culture of beneficial bacteria and fungi. Mycorrhizal fungi are proven to work in symbiosis with plant roots. The fungi supply nutrients to the plants and receive sugars from the plants in return.
Adding ground charcoal to the soil will darken it in the same way that chimney soot was traditionally added to soil in the days when every house had an open fire. Darkening the soil will cause it to absorb more sunlight and warm up earlier in the spring and remain warm longer in the autumn which will increase the microbial population. Warmer soil obviously benefits plant growth as well.
However, biochars work best as larger particles rather than powders so there’s far more going on than just soil warming.
Laboratory tests and data from Institut für Agrarrelevante Klimaforschung (Institute of Agricultural Relevant Climate Research) in Germany suggest that the 1,000 year or even permanent stability benefits claim is over-stated and the actual benefits range from 10 to 100 years which is of the same order as compost. However, Terra Preta is known to be 2,500 years old so my bet would be that the benefits of biochar will last for millennia rather than decades.
Certainly biochar locks up carbon that would be released quickly by normal burning or slowly by woody materials rotting down. In natural eco-systems, however, the CO2 released by rotting wood would be taken in by the growth of new plants and trees. Another German study in 2009 concluded that converting 10% of all their waste plant materials to biochar would actually only sequester 1.6% of their carbon. Whilst this may seem a small amount, large scale use of biochar does have the capacity to take out significant amounts of atmospheric carbon dioxide.
Not all the studies on biochar are positive but generally they show around a 20% gain in crop yield when compared with untreated soil. Some studies into the effects of biochar on plant growth have shown negative effects or no effect when compared with untreated soils. Most worrying are some studies showing reduced numbers of earthworms in soil with biochar. Some reports are that it gave great benefits on poor and degraded soils but less so on soils already rich in nutrients and organic matter.
The differences in results reported isn’t really surprising, there are so many variables that can be affecting the results, including:
- How the biochar was made.
- What temperature it was made at.
- Particle size of the biochar
- How it was charged or if it was charged at all
- Soil type (in the UK there are 22 recognised soil types!)
- Nutrient levels in the soil.
- Organic matter / humus content of the soil
- Climate & weather conditions.
- Amount of biochar added
- If the biochar was added in one application or over a period of time
- Additional nutrients added with the biochar
- Application method (surface spread or mixed into the topsoil)
The general consensus is that to be immediately effective, biochar needs to be charged or activated. It’s like a sponge and will absorb nutrients, microbes and fungi. Just adding freshly made biochar into the soil will actually deplete nutrients that are being sucked into the sponge. Hence the poor to negative results of some studies.
Biochar is not cheap to buy. The price, weight for weight, is comparable with premium grade sustainably home produced barbecue charcoal. It’s far more expensive than the sort of charcoal you’ll find on a garage forecourt. That garage charcoal is most likely imported, the charcoal made from tropical hardwood (possibly illegally felled) and sometimes with chemical accelerators to help it burn. Definitely not the material to use for biochar!However, since the final particle size wanted for biochar is quite small (typically less then 10 mm), it could be made using brash wood – that is the tops and small-diameter branchwood left lying on the ground after the merchantable wood has been extracted (A – Z of tree terms: A companion to British arboriculture)
Brash wood is too small to be useful for barbecue charcoal. Making use of a waste product could be the way to produce biochar cheaply and even more sustainably.Although biochar is costly, unlike a fertiliser or compost, once applied it remains in the soil permanently.
We are well past the ‘does biochar work?’ stage. There’s plenty of hard evidence it does work but we still need to understand it better. Once we know more about what causes the observed results, we’ll be able to predict and advise under what conditions to use use it etc.
Just running trials on the multiple suggested charging methods, especially multi-year trials would be immensely useful. There must be some bio-scientist out there looking for a good subject to gain a doctorate!
With potential to sequester carbon into the soil it is a way to reduce carbon dioxide in the atmosphere whilst regenerating degraded soil so it produces more crops with less inputs, it is certainly well worth more study.
Do be careful not to overdo it initially, small is beautiful. Biochar is a permanent soil amendment – once you add biochar, it cannot be removed. Start with something like 0.5Kg per square metre. You can incrementally add more annually if you wish.
Since my Nuffield I decided to build a biochar reactor and after a few prototypes, up-cycled various items from around the farm to build a 2 drum biochar drum using the principle of set out by Bob Wells which is a double burn or ‘burn the smoke’ method which produces a great soil amendment without having the problem associated with CO2 production.


